
Tutorial ©Jascie October 1, 2007
Artwork ©Barbara Jensen www.eroticartistgallery.com
This is an example only! Do not use her artwork without proper licensing!
Please visit Barbara Jensen Tubes for information on puchasing her artwork.
............................................................
Things you will need:
Paint Shop Pro
Tube of choice
Fonts of choice
Plugin Filter Eye Candy 5 - Nature - Corona
............................................................
Save your filter to your PSP plugins folder.
Open your tube. Go Shift + D, and minimize the original.
Add a new raster layer and move this to the bottom. Flood fill with black or a dark color from your tube.
Now add a new raster layer.
With your selections tool, set at circle, select a small circle about center of your tube. Flood fill this with the same color. Go selections - select none.
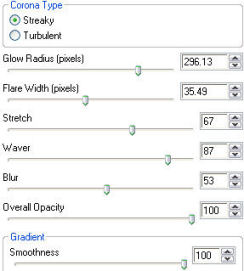
Now go effects - plugins - Eye Candy 5 - Nature - Corona with these settings: Text 100pt, Hollow.
Now go adjust - hue & saturation - and colorize to your desire depending on your tube.
Now in your materials palette, set your foreground to the color your just colorized to. Go to your selection tool, this time setting it to rectangle. Add a new raster layer. Draw out a vertical selection along the left side of your canvas. Flood fill this with the color. Go selections - select none.
Now duplicate and go image - mirror. Then go layers - merge - merge down. Set the blend mode of this layer to difference.
Now hide your tube layer.<br>Go layers - merge - merge visible. With your mover tool, move this layer towards the top.
Now add a new raster layer. With your selections tool once again select the bottom portion of the canvas. Flood fill this with black or the dark color you used earlier. Go seleections - select none.
Now go to your text tool, with your favorite font set at vector. Type in your favorite sayings, a quote ect until it fits into the bottom portion of the canvas. Convert to a raster layer. Set the opacity of this layer to 70.
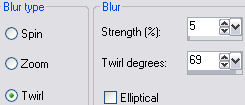
Now go to your tube layer. Go adjust blur - radial blur with these settings:
Then go image - resize, and resize at: 103% - smart size - all layers unchecked. Now go adjust - hue & saturation - colorize, make this the same color as before.
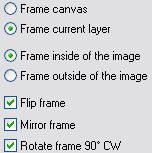
Now go - image - picture frame at these settings:

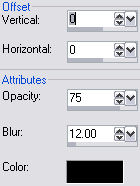
Now merge all layers visible. Now with your magic wand select the out side white edge. Go edit - cut. Go selections - select none. Now go image - canvas size - at 600 x 600 - centered. Go effects - 3d effects - drop shadow with these settings:

Now copy and paste your tube as a new layer. Repeat the same drop shadow.
Now add a new raster layer and move it to the bottom. Flood fill white.
In your materials palette, set your background to white and your foreground to black or your dark color. Go to your preset rectangle shape with the stroke set at 3. Draw out a rectangle just a bit bigger than the height and width of the image(refer to tag for example). Convert this to a raster layer. Go effects - 3d effects - drop shadow with these settings:
Now go back to your white bottom layer.
In your materials palette set your background to the color you colorized to. Using your preset rectangle shape once again draw out a bigger rectangle. Convert to a raster layer.
Go to your edged back layer.
Add a new raster layer. With your selections tool, draw out a horizontal rectangle from the left side of the white back layer to the right side close to the top(refer to tag for example). Flood fill this black or your dark color. Go selections - select none. Now duplicate this layer. Then go image - flip. Now go layers - merge - merge down.
Add a new raster layer. Now with your selection tool once again draw out a selection from the top left corner of the bottom rectangle to the bottom edge, making sure to overlap both left edges of the other two layers as well as the two horizontal bars. Flood fill this black or your dark color. Go selections - select none. Then go layers - merge - merge down.
Now go to your selections tool, and set it at the rounded rectangle.
Select a small round rectangle at the top intersection point of your bars.
Hint: go selections - edit selection, if you need to move it around a bit, just use your mover tool to do so. Remembering to go selections - edit selection when done moving.
Now go edit - cut. Now go selections - edit selection. Then image - flip. Then selections - edit selection. Then edit - cut. Go selections - select none. Add the same drop shadow to this layer as above.
Now using the eraser tool, set at square, opacity set at 100, and size set at 15. Very carefully erase the drop shadow overhang on the right side of both the horizontal bars.
Go to your bottom rectangle. Using your magic wand tool, select the outside of the rectangle. Go back to your bars layer. Go edit - cut. Then go selections - select none.
Go to your bottom rectangle layer. Add the same drop shadow as above.
Now its time to add some more text, this time select another font, this will be the lettering for the vertical bar. Go to your bars layer. In your materials palette, set the background to white. Go to your text tool making sure that its set at vector and stroke 0. Type out a title for your diary. Now go image - rotate - free rotate - 90 degrees - either left or right, depending on how you want it to look. Center it in the middle of your vertical bar. Then convert this to a raster layer. Set the opacity of this layer to 70%.
Now hide your white bottom layer. Go layers - merge - merge visible. Unhide the white layer once again.
Now add any copyrights, license numbers ect needed for the tag.
Now to add the final text. In your materials palette set your background to black or your dark color and the foreground to white. Go to your font tool and set to your first font you used, settting it at size of choice, stroke at 2, and vector. Type out your name or that of a friend. Place in position of choice. Convert to a raster layer. Now add the same drop shadow as above.
Now hide the white bottom layer. Go to your crop tool. Click on the merged opaque button. Then click on the check mark. This will get rid of any excess white.
Now Save it!
Ta Da! You're Done!
............................................................
Feel free to text link only or print out for own personal use. But do not copy it in anyway to put online, pass out, use for profit or rewrite without my permission.